Category Archives: Preparation

Preparing for a long distance cycle ride

Since returning to the UK, we’ve re-settled in North-East England and have taken up cycling as a way to improve our fitness and with an aim to resurrect a years old plan of completing the Coast-to-Coast (C2C) cycle route. As is fairly typical for us our ambitions swelled (we did initially only plan on travelling for one year after all) and the C2C changed into the G2C2C (Gateshead-to-Coast-to-Coast), a loop from our home in Gateshead along the Hadrian’s Cycleway to Whitehaven and returning along the C2C path.

hcw-map
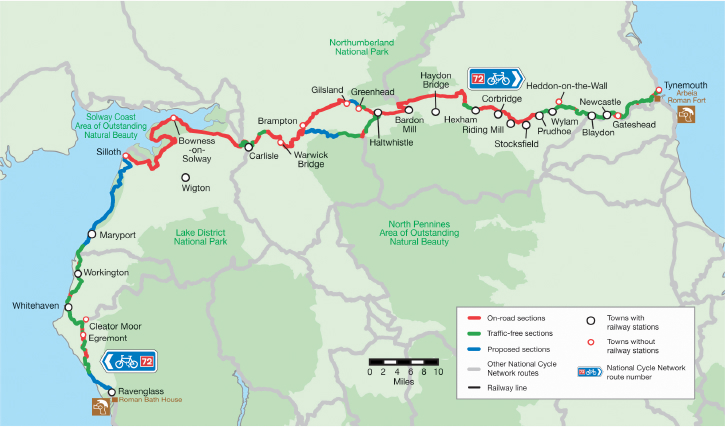
Hadrian’s Cycleway route [image source: Cycle-Routes.org]

c2c_imagemap
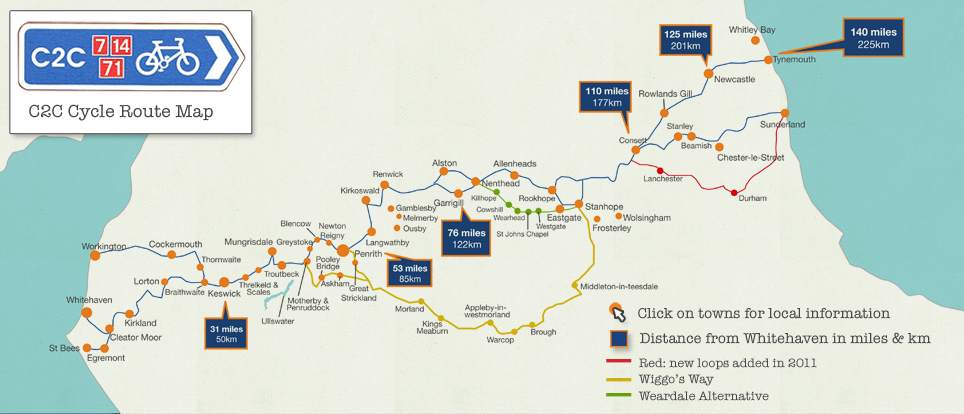
We’ll be tackling the blue line route from Whitehaven to Tynemouth [image source: C2C Guide]

Kit

Obviously before beginning such a venture a certain amount of kit is required, not least a bicycle! Cycling can be an expensive hobby especially if, like Andrew, you’re easily tempted by shiny gadgets and gizmos, but we’ve managed to restrain ourselves pretty well and have gradually accumulated bits and pieces as the need arose, finding that many items can be sourced cheaply, second hand or otherwise, through eBay or Gumtree.

Bikes on Lanchester Railway Path
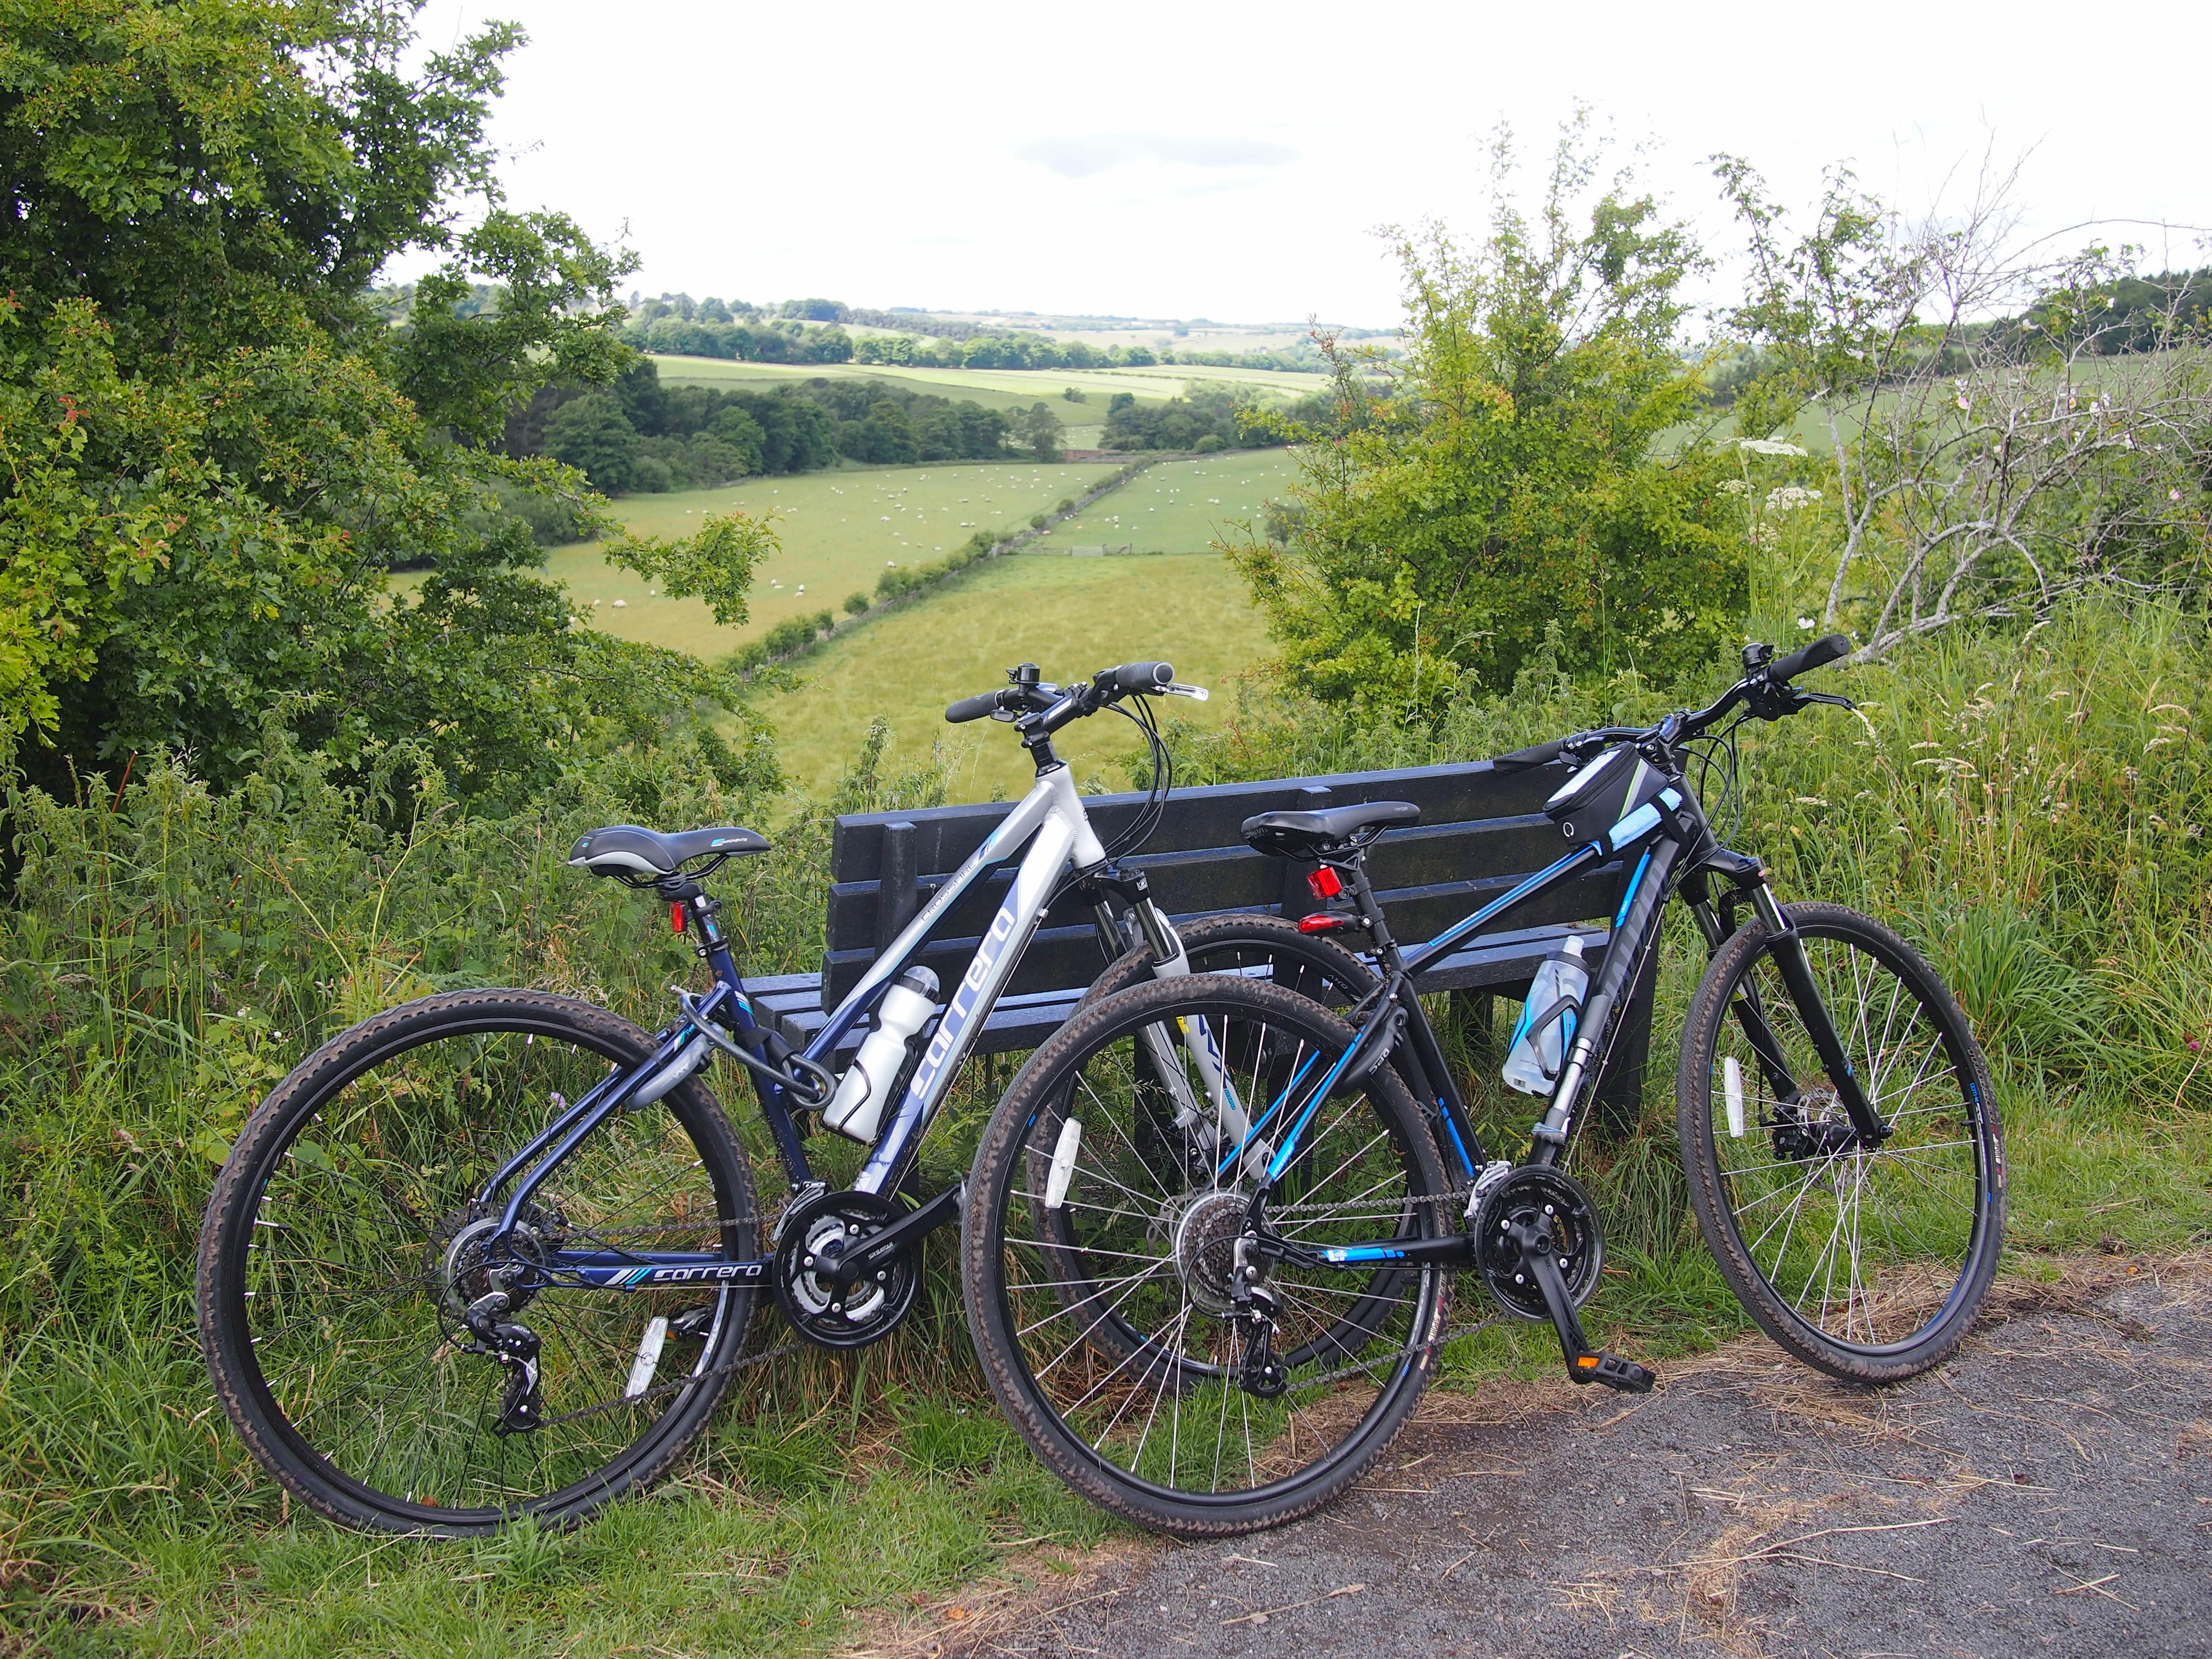
Our bikes propped against a bench beside the Lanchester Railway Path between Durham and Consett

This is what we would deem essential for training:

  • Bicycle – We opted for hybrid style bikes which are a good compromise between lightweight road bikes with very thin tyres and the chunky tyres and suspension of a mountain bike, perfect for riding a combination of trails and roads.
  • Helmet – I don’t really need to explain this one do I? This video on cycle helmets made by the Manitoba Government made us smile!
  • Water bottle – ideally with a cage attached to the bicycle’s frame.
  • Pump and puncture repair kit – fortunately we haven’t needed these too often whilst we’ve done our training (we’ve had just two punctures) but you really don’t want to be stuck on a remote trail with a flat tyre and no way of fixing it.
  • Padded leggings or shorts and gloves – we got cheap versions as we weren’t sure how much difference they would make. The answer is A LOT! Bottoms and hands unaccustomed to long bike rides will start to feel sore anyway and a little padding to keep that at bay for as long as possible was much appreciated. On a more positive note, I’ve noticed that the more training we do the longer it is before my bottom starts to ache, not that I’ll be ditching my padded leggings any time soon!

PunctureThe only puncture (so far…) that we’ve had to repair on the road

Nice to have bits of kit include:

  • Pannier rack and bags – it’s possible to make do with a small rucksack to carry packed lunch, snacks and waterproof jackets for training rides but it’s more comfortable if they’re in a bag attached to the bike rather than on your back. Obviously for the actual ride panniers will be necessary for our (hopefully) small amount of luggage.
  • Cycling computer – it’s good to be able to log miles while you’re training to track your progress. We’ve used the free Strava app on Andrew’s iPhone.

Training

Of course once we had our bikes the next step was to get some miles under our tyres. It’s been helpful that we weren’t working for most of the summer and so could move our rides around to fit in with the best weather, and do longer rides during the week leaving us time to catch up with friends and family at the weekend. All told over 14 weeks of training we’ve covered almost 1500 miles. We started out from a fairly active lifestyle (i.e. lots of walking) but it was a long time since either of us had done any regular cardio training. We found that we were pretty quickly able to build up from 15-20 mile rides to about 40 miles and then gradually up to 70 miles within 10 weeks, doing 3-4 rides per week. In the final month we continued to build our stamina and found that we were getting faster without trying and I was pleased to notice that certain uphill sections also seemed to be getting easier as the weeks passed.

Gateshead cycle pathWe’ve found the paths on the National Cycle Network to be reasonably well signposted

We are incredibly lucky to have a veritable maze of paths close to our home meaning that we’ve been able to vary our routes easily without needing to do much riding on busy main roads. The Sustrans website has a useful map function and information on the National Cycle Network and it’s pretty easy to create routes in Strava too.

Cycle paths collageWe’ve found a wide range of cycle paths (clockwise from top left): clifftop path north of Sunderland; Jo and Andrew cycle the forest trail along the Derwent Walk; path through farmland north of Newcastle; country road in Northumberland

While the Hadrian’s Cycleway is reasonably flat, the C2C will be more challenging as it passes through the hilly Lake District and the northern Pennines. We’ve tried to prepare for this as best we can with some of the hills which are within range in Co Durham and Northumberland and also by regularly riding longer distances than our C2C days to ensure our overall fitness is high enough. Fingers crossed that will be enough!

Downhill from Ryal, Northumberland
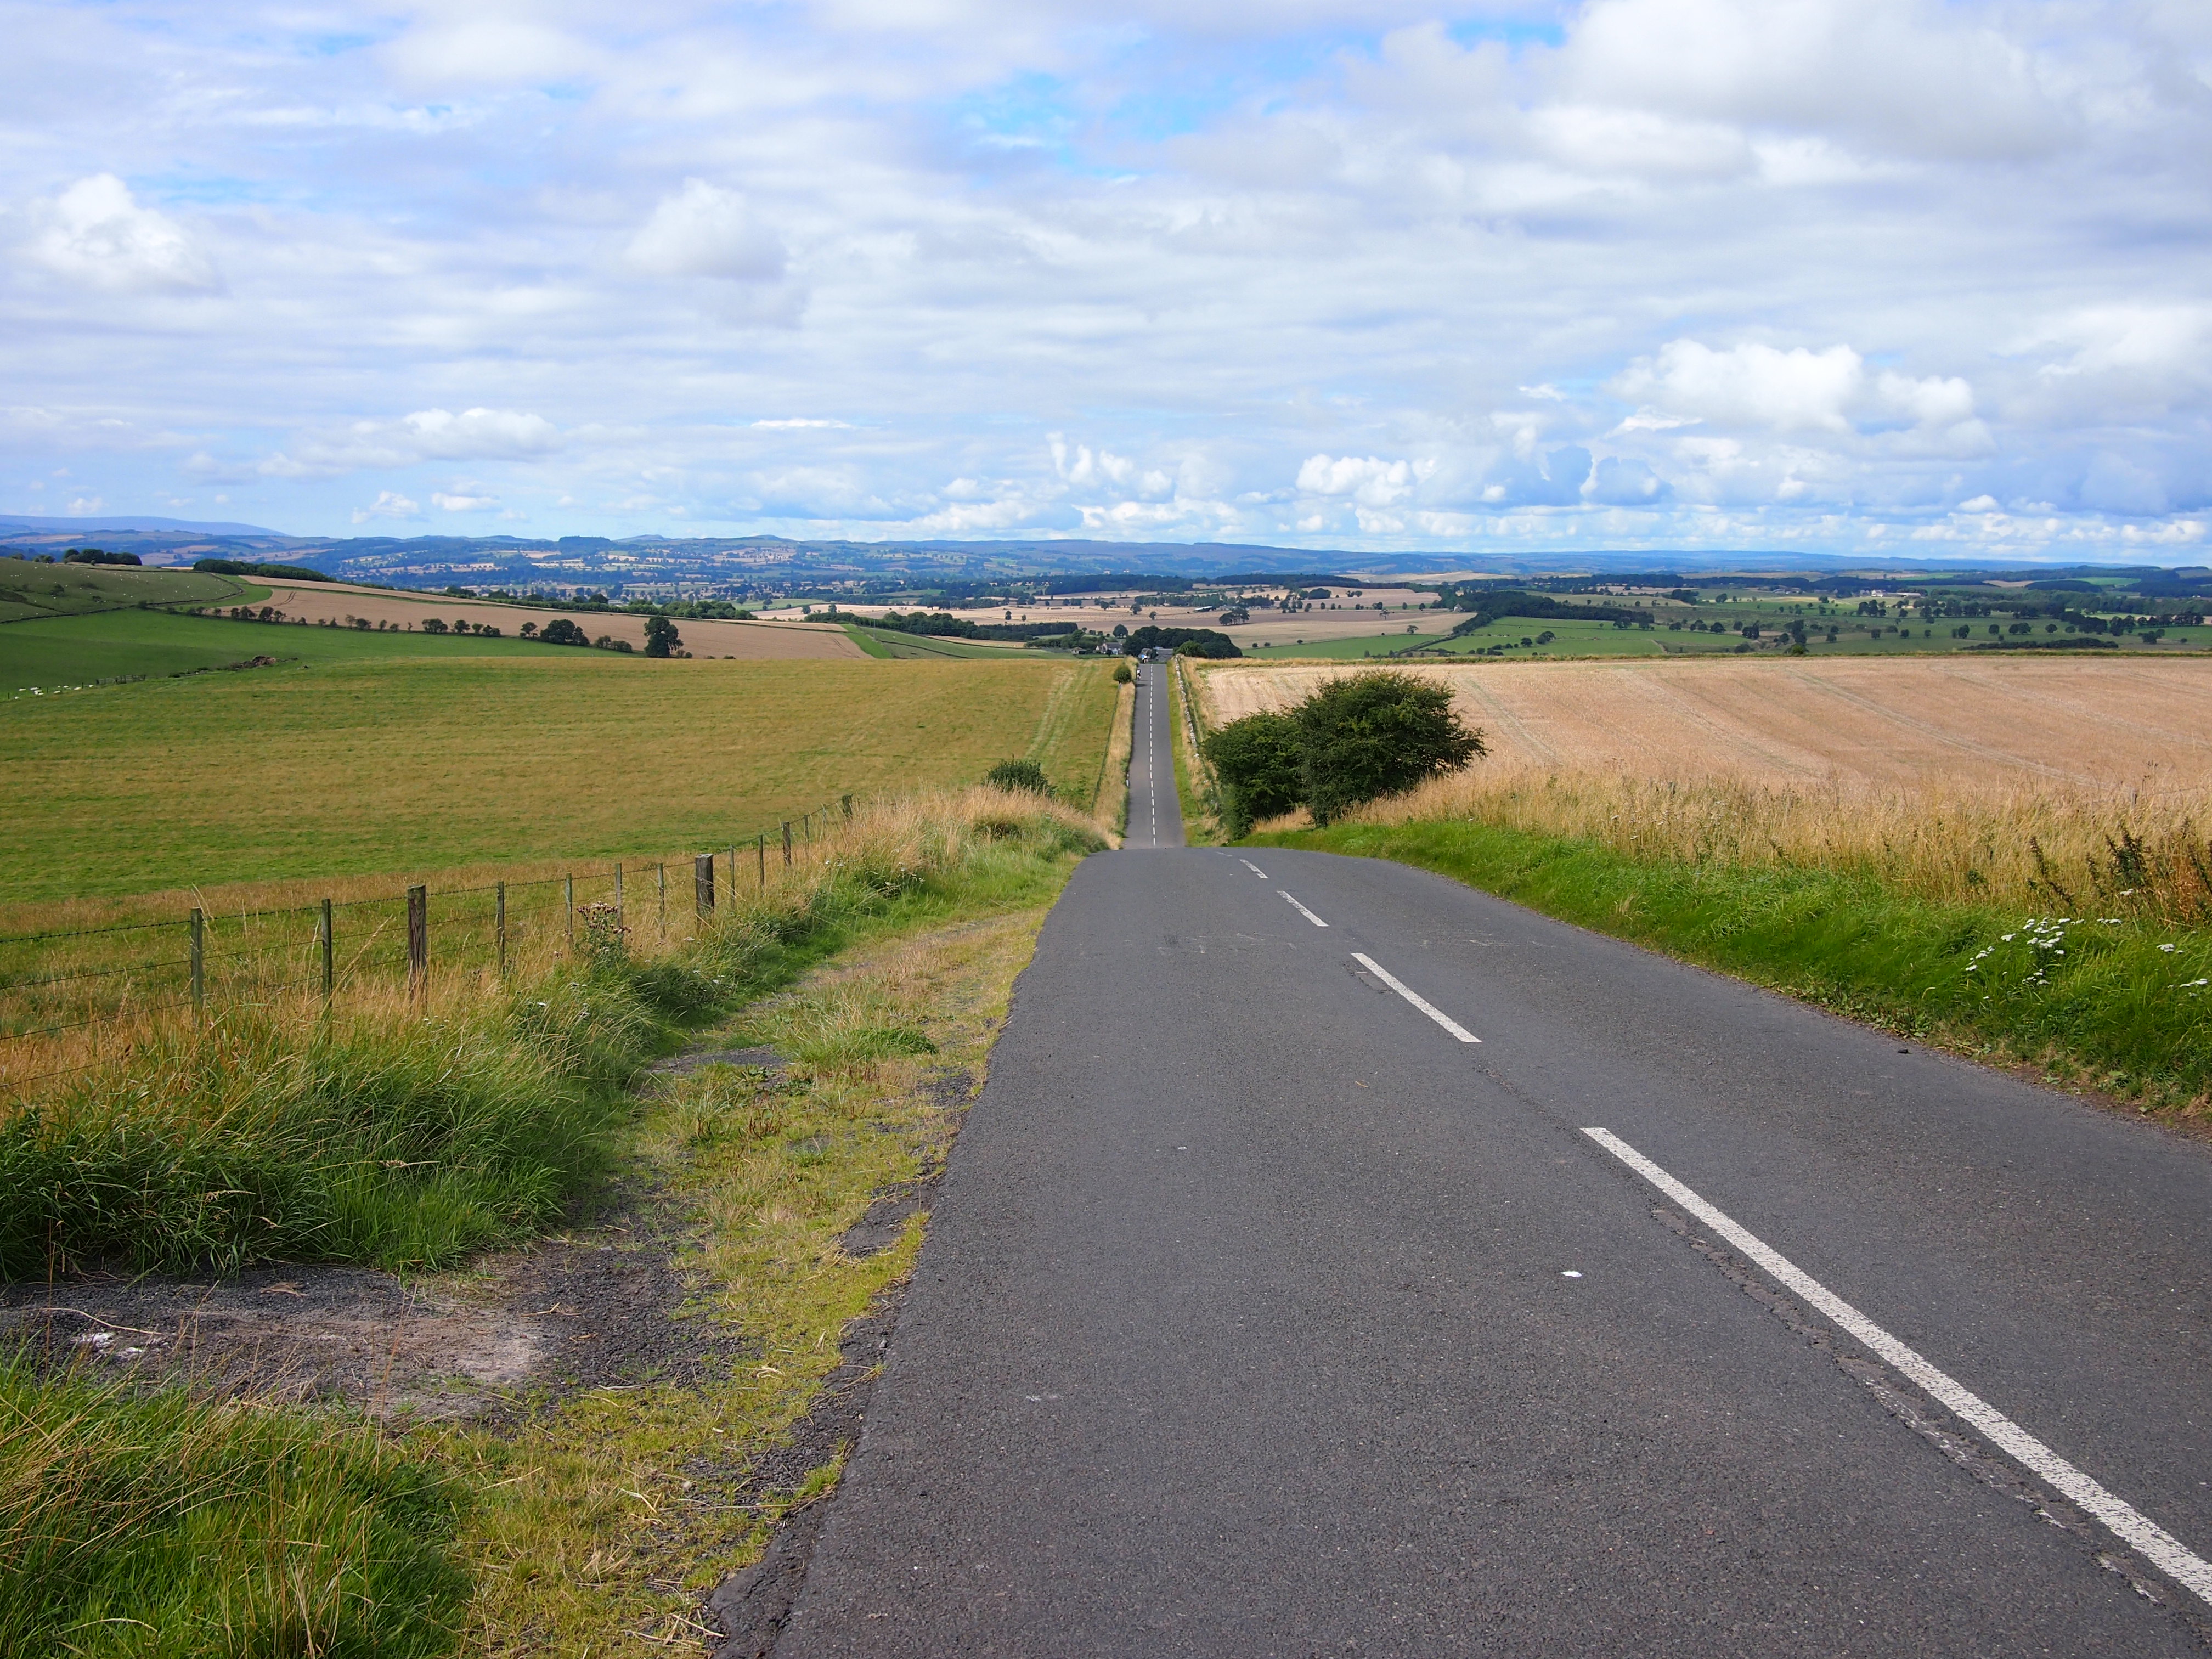
Although we know we need to train for hills, we were very glad to be heading downhill on this road!

Planning

Having kitted ourselves out and worked on our fitness, the final step was to plan the route and accommodation. There are lots of resources online to help with the decision on where to break the journey and Sustrans publish a map of the route options and a book describing each section which we found helpful for assessing distances and elevations. We decided on two days to cycle to Whitehaven along Hadrian’s Cycleway, a rest day in Whitehaven and then three days back with overnights in Penrith and Rookhope. Some exceedingly fit people do the whole C2C in one day with the record being under 8 hours for the 140 miles but we want to enjoy the journey as well as challenging our bodies and fully expect to be stopping to take photographs and enjoy the view, not just racing along with our heads down.

We’re hoping to do a short blog post each day with statistics of the day’s ride and a couple of photos (WiFi availability dependent) then we’ll summarise the trip once we get back.

How to pack for a Two Year Trip

As we mentioned before we set off in our packing dry-run and what do you pack for a two year trip posts, there’s plenty written about what to take on this kind of extended world travel and why to take it. Once you’ve read your fill of those posts and made your kit decisions, here’s a post on how to pack that kit for epic adventures!

Our large rucksacks with space to spare from our packing dry run 4 months before we set off

Our large rucksacks with space to spare from our packing dry run about 4 months before we set off

We carried two rucksacks each – a small one for valuables and day trips, and a large one for everything else. The smaller rucksacks are great for carrying shopping when we visited markets, and for overnight trips like when we spent a few days in Chiang Rai from our base in Chiang Mai, Thailand, or as an overnight bag when we slept on the caravan sofa bed my brother and family hired in Amsterdam.

First, some general tips on packing rucksacks:

  1. Put everything in separate carrier bags – this is to make the contents waterproof. They want to be no more than ¾ full so the top of the carrier bag can be rolled or folded over. If it’s electrical: cables, batteries, camera memory cards, or made of paper (books, leaflets or entrance tickets) use two – they’re light and take up no extra space.
  2. Put the heavier stuff at the bottom – this will make it easier to lift, easier to carry, and its better for the spine too.
  3. Have a place for everything – it might take a few un-packs and re-packs starting out, but 3 months in we had our systems down to a fine art. The benefits are not just being able to quickly find stuff when we needed it, but we knew we had everything before we left because we got used to the order everything had to be packed in!

How to pack a rucksack

Basic rucksack packing guide

Basic rucksack packing guide. The photo was taken outside the Hostel Hospital in Sabile, Latvia near the start of our trip

Top Pocket: Handy stuff we might need in a hurry: raincoat, hat, scarf, gloves, toilet roll

Side Pockets: More space for handy stuff! We’d typically put things like mugs, forks and spoons, suncream and mosquito repellant and padlock and chain-lock to deter opportunist thieves in the side pockets.

Starting at the bottom, here’s how we’d pack an empty rucksack..
Bottom: Heavy, bulky stuff at the bottom and towards the back (i.e. closest to the spine when it’s worn): Spare shoes, flip-flops, clothes in separate bags. I bought dry sacks, but carrier bags will do just fine. One bag for underwear, one for trousers, bottoms and swimwear, another for t-shirts and tops, and don’t forget a bag or two for dirty clothes or laundry – I try to find a colourful bag for laundry so it’s easy to spot.
Middle: This is the area hardest to reach as most rucksacks have openings at top and bottom. Here we put things we think we won’t need while we’re moving between places, such as souvenirs or books we’re not currently reading. This is also the place for toiletries. It’s worth having a wash bag (yes, even for the guys!) as it’s so much easier to carry toothbrushes, toothpaste, shower gel, shaving gear and deodorant to shared shower rooms down the hall from hostel rooms if it’s all in one bag. I took a medium-sized LifeVenture washbag which was perfect, but a carrier bag worked just as well on occasion.
Top: Anything we might need first when we arrive at our destination: Charging cables, any food provisions we had left over such as bags of pasta, tea & coffee, stock cubes and seasonings, sweeties, etc.

Side note.. on the pros and cons of rucksack liners:
Julie used a big waterproof rucksack liner, and on the whole would have preferred separate smaller bags for the single reason that invariably the thing you need is at the bottom which means unpacking your entire bag. That said, on the one occasion of our trip where our bags were completely soaked, everything of Julie’s stayed dry and our guidebook, which was in my rucksack but not in a plastic bag, took 4 days to dry out properly!

Given our experiences, we’d avoid rucksack liners in favour of carrier bags and smaller dry sacks because of the convenience. It’s a pain having to completely unpack when in dorms or we’re only staying somewhere for a few nights.

Day sack: On the move..

1 year in, Joypurhat, Bangladesh

1 year in. 17th March 2014, Joypurhat, Bangladesh – waiting for a bus to Paharpur (photo credit: Roman, a very kind student we met on the train)

When we were moving we’d have a quick think about what we were likely to need and pack that in our smaller rucksack, such as our sleeping bag liners, toothbrush and toothpaste and earplugs if we were on an overnight train. We’d always keep the most important things in our smaller day sacks as they’re much easier to keep with us or close by, and they’re easier to secure with a padlock.

A document wallet is the best place to keep passports, pre-purchased travel tickets, copies of travel insurance, spare SD-cards for digital cameras, emergency cash (in USD), and driving licences. Together with a document wallet each, we’d also carry our sunglasses, digital cameras (and spare camera lenses), iPads and my laptop in our day sacks.

Day sack: Out and about..

Andrew with a baguette in Dijon, France

The full french experience – carrying a fresh baguette through the markets of Dijon, France

If we were staying in shared accommodation we’d put all of the important stuff in Julie’s larger day-sack and padlock it, then put it in a locker or leave it with the reception in their luggage room. My smaller day sack was perfect for carrying the stuff we needed while we were out sightseeing or heading to the markets.

If you have any packing tips for long-term travel, please share them in the comments!

Two Years of Travel in Apps: Our recommended travel apps

It is getting increasingly easier to travel, the wealth of information from bloggers like us has made researching and travel planning a quick search away. Timetables and bus routes are generally easy to find for all but the least touristed destinations, and translation apps are arguably taking the fun out of ordering meals in restaurants – though you still have the choice to use them, and we never did!

Andrew's 64GB WiFi iPad Mini

Both our iPad Minis have been invaluable in preparing, planning and travelling around Europe and Asia for two years

Here follows a few mobile apps, websites and resources that we’ve used during our trip – are there any you’d add? Let us know in the comments!

Kayak - flights
Kayak

Kayak – Getting there

We tried to travel overland as much as possible, but on the few occasions we needed to fly we consulted Kayak. It’s our favourite app (and website) for finding destinations and checking routes because it shows lay-over times clearly and has easy filtering for the number of connections.

Rome2rio - travel planning
Rome2rio

Rome2rio – Getting there and getting about

Do any kind of search of the format “how do I get from Place A to Place B” and Rome2rio will rightfully be in the top results. It quickly became invaluable to us in planning our movement around Europe and Asia on our two year trip. It shows trains, busses, ferries, and flights on an interactive map and it’s an excellent starting point for finding out possible routes and rough pricing.

BlaBlaCar - car sharing
Bla Bla Car

Bla Bla Car – Getting about with the locals

A late entry to us but an easy recommendation that we’ll be using after our trip is BlaBlaCar – a car and journey sharing website! Introduced to us in its French language version – Covoiturage.fr – it was especially handy in Europe as some of the train journeys would have really eaten into our budget, plus we got to meet new people!

AirBnB - staying with locals or entire apartments
AirBnB

Accommodation – Finding somewhere to stay

Throughout our two year trip we’ve generally booked our accommodation about 2 weeks in advance, except for major capital cities and well, pretty much everywhere in Japan where we had to start booking about a month in advance to get the best deals.

For longer stays we prefer to rent private apartments or stay in apartment hotels so we can shop at the local markets and cook for ourselves. We’ve used a combination of fellow traveller recommendations, other travel blogs and accommodation booking websites, and our favourites (in order) are these:

  • AirBnB – Our favourite for booking homes and rooms around the world. We’ve had some truly amazing hospitality when staying with families through AirBnB, and its often been cheaper than hotels or hostels! We tend to seek out the new hosts – those recently registered, with few if any reviews but good descriptions and photos.
  • Booking.com – The first app or website we checked when looking for shorter stays.
  • HostelWorld.com – Great when we started out, but over the two years we’ve been away the prices, especially in Europe, have rocketed up. It tenuously maintains a place on our list as a resource of last resort as I can’t remember the last time we actually made a booking through it. Oh, and there isn’t a secure way to log in to the website.
  • 9flats.com – AirBnB-like rival that we’ve used occasionally when we haven’t found anything on AirBnB.

No CouchSurfing on our list? We did stay with friends 5 times on our trip which would qualify as CouchSurfing experiences, but we arranged them with people we met on the road as we went, or who we already knew.

Map.me - essential offline maps
Maps.me

Maps.me – On the ground

We’d usually pick up a map from the hostel, hotel or local Tourist Information office as they’re quicker to consult and easier to carry, and in some poorer Asian countries we didn’t want to be flashing expensive electronics around. However, there were a few times in some of the smaller towns when it was difficult to ask directions where Maps.me proved invaluable. Note that you need to download the maps for the country or region in advance, and they’re often a few hundred MB so remember to save the remoter destinations before you depart!

XE - currency exchange rates
XE Currency
Rates

XE Currency Exchange Rates – Knowing what stuff costs

Not an app that we used often, but essential nonetheless as we used it to work out a rough exchange rate to our home currency we could carry in our heads. It also works offline too.

forecast.io - weather forecast
Forecast.io

Forecast.io – Planning around the weather

Once we had our list of sights to see, activities to experience and restaurants or cafes to visit we’d have a quick check of the weather forecast. Oftentimes we only had a few days in a place, or other constraints like opening times or museum closed days would dictate the order of our travel itinerary more than the weather, but when we had flexibility we’d plan the outdoor things for the better days. We’d often do the outdoor activities sooner if we knew the weather was going to be good.

Google Translate icon
Google
Translate

Picking up the lingo

We always try to learn a few words of the native language and it really helped build rapport when ticket sellers, market vendors, shopkeepers and waitresses heard us making an effort. Not everyone speaks English and nor should they!
This involved a quick online search for the common phrases before we arrived, such as “Hello”, “Please”, “Thank You”, “Sorry” and the first few numbers. If we were staying longer we’d make more of an effort to learn the most common questions and our answers. We’d occasionally use Google Translate but it was often easier (and more fun) to watch people decipher their language written by us or to draw pictures in a little note book.

TripAdvisor icon
TripAdvisor

TripAdvisor – What to do when you get there

We took it in turns to do the majority of the planning each month, an idea we got about sharing the workload from a post by travel bloggers Warren and Betsy. Guidebooks and longer-form travel articles form the starting point, but then we’d do typical “Top 10 in X” searches and cross-reference with TripAdvisor to make sure we hadn’t missed anything. With the latter we found it’s important to read the most recent reviews as often the bad reviews complain about things that either aren’t relevant or don’t bother us – don’t just use the star rating! Good reviews often contain tips for visiting, e.g. best time to visit, how to skip the queue or join a free tour.

In no particular order, here’s a list of travel blogs we follow for inspiration or consulted often..

  • Legal Nomads – Jodi has a wonderful writing style and fantastic posts for South East Asia, especially Vietnam. We stayed at the Nyugen Shack in the Mekong Delta because of her post!
  • Never Ending Voyage – An inspiration for us when we started researching at home as they’re a young couple from the UK like us. Their photos are amazing and Erin’s posts on Thailand accommodation are excellent. We happened to be in Chiang Mai at the same time and we tried to meet up but they were too busy!
  • Married with Luggage – Warren and Betsy have created a great archive of travel writing, though more recently they’re about helping others find the good life through travel and the “how” rather than the “where”.
  • Ottsworld – Sherry Ott’s one-woman adventure-seeking is inspiring travel writing, and she also takes stunning photos.
  • Uncornered Market – Daniel and Audrey have put out a wealth of information and inspiration that convinced us to visit Central Asia. They’ve covered most of the planet and remind us to be more adventurous!
  • Amateur Traveler Podcast – Chris Christensen interviews people about the their recent travels. His entire back catalogue is available and we’d often listen on trains, busses or over dinner to tales about the next country or city on our itinerary. See if you can spot the names of guests from the links above!

While we’re researching, we make notes of places that interest us as we find them on paper, in Trello or in spreadsheets, which we then go back through to look into further: reviews, how to get there, opening times, etc

Dropbox icon
Dropbox

Dropbox – Documents backup and photo sharing

We planned for the worst – lost or stolen baggage, technology, and travel documents – and we kept photocopies of passports, passport photos, visas and insurance documents in Dropbox. It’s also great for sharing photos with fellow travellers when we were in places without internet access as we could swap email addresses and upload and share them via a shared folder later. If you sign up with this affiliate link we’ll each get an extra 500MB of space!

WiFi Photo Transfer icon
WiFi
Photo Transfer

WiFi Photo Transfer – Simple, local photo sharing

We’ve often wanted to transfer photos between our iPad minis, onto the laptop, or with other travellers we’ve spent the day sightseeing with. This amazing free app is really handy for transferring larger numbers of files, but its killer feature? It shows photos in albums by default so we could quickly organise then transfer just the photos we wanted!

Skype icon
Skype

Skype – Keeping in touch

We kept this blog for two reasons: we wanted to write about our adventures as a reminder for ourselves, and to let our friends and family back home know what we’ve been up to. In addition we’d always send our families an email or text message with our travel plans such as flight numbers, accommodation etc, but there’s no substitute to actually seeing and hearing those we missed most. I talked to my Mum about this and we agreed that just the first few seconds of a Skype call are enough to reassure us that they’re alive, well, and enjoying themselves – and that goes both ways! Our Christmas presents to both sets of parents before we left was setting up their computers with webcams and a quick Skype training session :o)

Rain, Rain icon
Rain, Rain

Rain, Rain – Help getting to sleep

The soothing sound of rain on all manner of surfaces helped us get to sleep by blocking out the noise of other travellers on trains or in hostel dormitories. My favourite sound is the rain on a tent, but Julie preferred listening to podcasts (which she’d then have to listen to again as she’d often missed the endings!)

Trainyard icon
Games

Games – Idle entertainment

We found we couldn’t see sights every day for weeks on end and remember everything – sometimes we just needed a break, and a favourite way I like to relax is playing games. When there wasn’t anyone to play cards or boardgames with, like the time we played cards with a bunch of Mongolian students on the train from Ulan Ude to Ulaanbaatar, we’d play the occasional computer game. Ones that work offline are obviously the best.

  • Mahjong Solitaire Epic – Classic tile puzzler
  • Flight Control HD – Cute traffic controller-style simulator that’s also one of Julie’s favourites. I like to play it on flights
  • Extreme Road Trip 2 – Dukes of Hazard meets Paperboy in this go as far as you can stunt racer
  • Asphalt 8 Airborne – I love racing games. Asphalt has amazing graphics, beautiful cars, and enough upgrade management to keep it interesting
  • Trainyard – Clever twist on the routing puzzle game, with coloured engines. A good game for train journeys!
  • Reckless Racing 2 – Lovely top-down racing games with plenty of sliding and drift
  • Letterpress – a very clever word game that Julie usually wins because she plays strategically whereas I try for impressively long words. This one needs internet access.
  • Clash of Clans – Saw this advertised everywhere in South Korea and became addicted. I now lead a clan named after Penny Arcades D&D exploitsAcquisition Inc (#RG98U9P) – and we’re recruiting! This one also needs internet access.. :o)

Tips for visiting Bangladesh

We’ve found Bangladesh to be an incredibly rewarding destination. Its sights are varied and its people are friendly, however it can also be challenging and tiring, and there are some parts of the culture which it’s good to know about in advance. Here’s our list of top tips to get the most out of a trip to Bangladesh.

Clothing

For women, wear long trousers (or skirt) and a loose fitting top with sleeves (3/4 length is OK). You’ll get looked at anyway and not wearing tight or revealing clothes will make that a little less uncomfortable. You could even buy yourself some local clothes. Unless you’re visiting a mosque, wearing a headscarf is not necessary – not all Bangladeshi women wear them although most do. For men, long trousers and a shirt or T-shirt is fine. Only little boys wear shorts…

20140422-175315.jpgCulturally appropriate clothing

Eating

Eating is usually done without cutlery although most restaurants will give you a fork and/or spoon. If you want to try the local way (we highly recommend it!), make sure to only use your right hand as the left hand is considered unclean (its use is in the bathroom). It’s OK to use both hands to tear off a piece of bread but don’t put anything into your mouth with your left hand. An excellent consequence of eating with the hands is that a washbasin is almost always available, and if not someone will be able to help by pouring water from a jug over your hands.

20140416-225335.jpg

Drinking

We don’t usually drink mineral water as we object to paying for water and dislike the amount of plastic waste from all the bottles. In other countries we’ve boiled water or refilled our bottles from filtered water in the place we were staying. We boiled some water in Dhaka and although it didn’t make us ill it tasted really bad so we were pushed towards mineral water for our stay. Most hotels provided a large bottle in the room although it’s a good idea to check that it is sealed as some hotels refill bottles from the tap.

Offering and Receiving

When giving or receiving anything (money, bill, shopping, gift…) use your right hand (similar reason to above). We found this one needed quite a bit of concentration, especially when trying to take whatever we’d bought from the vendor and pay at the same time!

Be friendly

You won’t have much choice about talking to people – Bangladeshis are incredibly open and friendly. Be patient with people, everyone wants to say hello, and we found that shopkeepers were rarely trying to sell us something, often they just wanted a short chat and a photo of us with them. It’s really easy to take photos of locals too, if the market vendors aren’t calling out for you to take their photo then just waving your camera and smiling is generally enough to get their agreement.

20140424-165053.jpgInvited into a shoe shop for a chat in Khulna

Say yes sometimes

We had some great experiences by agreeing to accompany locals places when usually we might have been a bit more reserved. Hasan, a student we met in Dhaka, spent a day and a half showing us around and wasn’t afraid to just walk into places we’d normally just try to peer into if we knew they were there at all (craftsmen’s workshops, schools, onboard a docked ferry to name a few!). We met Khoken and Nilu at a tea stand and got chatting, afterwards they invited us to their home where we met their children, ate homemade sweets and got photographed many, many times as well as having a good chat.

20140422-175107.jpgNilu, Julie, Oishi, Andrew, Shish, Khoken

Prepare your answers to the following questions

Most locals don’t speak much English and so conversations usually proceed some way down the following list until they run dry…

  • How are you? – the standard response we got when we asked the same question was “I’m fine, thank you”
  • What is your country? – if they weren’t sure how to ask that they would call out country names as guesses, “Canada”, “Australia” and “Germany” all seemed plausible but “China” and “Japan” were just as common?!
  • What is your purpose/function in Bangladesh? – saying we were tourists always went down well
  • How are you feeling about Bangladesh? – the only possible answer here is ‘very good, Bangladesh is a very beautiful country’ which fortunately was also the truth most of the time
  • What is your service/profession? – how you earn your money is a source of interest and denotes your social standing, we came across some very impressive sounding job titles

Lower your accommodation standards

Most places are not set up with the expectations of foreign tourists in mind. Apart from the capital, Dhaka, where there are more options, the swankiest hotel in town will probably be fairly clean and have aircon and hot water, but in other hotels expect grimy bathrooms, hard beds and cold showers. Bringing your own sleeping bag liner is a good idea for any time when you’re not convinced by the cleanliness of the sheets although most times we found the floors and bedding looked OK but the walls had never been touched since the hotel was built. On the positive side rooms are incredibly cheap, a double room with ensuite bathroom in a middling hotel was £10 or less, and even the ‘swanky’ business hotel option was only £20-30.

20140424-170516.jpgOur room at the not so salubrious Hotel Hera in Mymensingh

Baksheesh

We already wrote about how difficult we found the whole concept and workings of baksheesh (or tips, or gifts, or bribes…) and I’m not sure that we ever felt comfortable enough with it to be able to offer advice although one useful thing that we read said not to feel pressured into giving if no service had actually been rendered.

Internet access

Finding wi-fi access points was a constant struggle. The only accommodation with wi-fi tended to be the higher end and business hotels, and while these weren’t really expensive it did seem a bit crazy to be paying an extra £10 per night just for internet access. Many of the smaller towns didn’t have that option anyway. Our next favoured option was to find a cafe or restaurant with wi-fi, these were thin on the ground and tended to be more expensive than (and not as tasty as) our usual eateries so we generally nursed a cup of coffee or Sprite for as long as we needed the internet! Failing that, internet cafes do exist but there weren’t many of them and they were small. Suffice to say most of our internet usage in Bangladesh was just keeping up-to-date with emails etc and falling behind with blogging and photo uploads. I suspect that a 3G SIM would be a good option if you had a smartphone with you. Mobile coverage was excellent and data packages looked to be quite cheap.

20140424-155536.jpgChecking emails in an internet cafe in Dinajpur

Ride in a rickshaw

Cycle rickshaws are the main form of transport for anyone needing to travel across town in Bangladesh. They’re great fun to ride in, you’re up nice and high so you can see what’s going on but travelling slow enough to take photos. They’re super cheap too with most journeys being less than £0.50. We have a few tips to avoid getting ripped off (in local terms…) but we also tried to remember that these guys have to work really hard for the few pence that we were paying them:

  • agree the price in advance so there are no unpleasant arguments at the end – drivers often ignored our ‘how much?’ and tried to make us just get in but we were persistent
  • try to have correct change – a few times drivers wanted to keep the difference as a ‘tip’ (there’s that baksheesh again…)
  • we once successfully used the guide price in the guidebook – the driver was asking for Tk100, we showed him that the Lonely Planet said Tk10 and he just agreed!

20140416-225343.jpgSeeing sights like four people in one rickshaw made us feel slightly better about getting into one with all our bags!

Bring a carrier bag

We heard that plastic bags were forbidden by law, certainly they’re uncommon. Anyone who has seen the mounds of plastic rubbish which can accumulate in developing countries will attest to this being a very good thing. Street food was usually served either on a small plate to eat at the stand and then pay, or in a twist of newspaper to takeaway.

20140424-160249.jpgJalebi served in a small dish on the streets of Dhaka – I guess we need to eat them straightaway then!

Appreciate the art

Bangladesh is home to the kind of professional painters who no longer exist in most of the developed world. Everywhere we went we saw handpainted signs advertising goods and services, everything from the name painted above a shop’s entrance to a whole wall the size of a billboard. The rickshaws are an art form in their own right, they are colourfully decorated with paintings of film stars, birds, animals, even the Taj Mahal.

20140424-155750.jpgHandpainted fruit juice advert on a wall in Sonargaon

Bus travel

I could probably write a whole post about this. Taking buses in Bangladesh is something of an extreme sport. It can be extremely scary, bus drivers drive crazy fast, definitely haven’t been on the fuel efficiency course (both acceleration and braking is done hard), they sound the horn often, and seem unconcerned for their own safety or that of their passengers.
As a side note, make sure to insist your luggage goes on the roof, the conductor only wants it to go inside the bus so that he can try to charge you the price of a seat for it.

20140424-155523.jpgIt’s not just luggage that travels on the bus roof in Bangladesh

Painful preparations

2 Needles
As you may have seen, we’re planning quite a trip that’ll take us through quite a few countries, which means we’re likely to encounter quite a few nasty diseases.

And that means quite a few jabs.

How many jabs you ask? Well, we’ve been attending our local NHS surgery every week for the last 6 weeks and we’re now on first-name terms with the local nurse – is how many jabs.

Ouch

Now, I’m no fan of injections. Or pain in general really. My Mum will delight in telling you I’m pretty squeamish, though you need just ask her which one of us it was that passed out and fell under the operating table when I was laid out having my finger stitched up. I’m definitely my Mother’s son.

And I was not looking forward to the multitude of injections that, according to our research of the most likely diseases we might encounter, and verified by Nurse Karen, we thought it best to get vaccinated against. Out of curiosity, what is the collective noun for injections?

Anyway.. comparing the symptoms of the diseases with the mild and short-lived pain of injections is the easiest way to convince yourself the injections are worth it. Just take a look at of some of these..

Rabies:

Symptoms expand to slight or partial paralysis, anxiety, insomnia, confusion, agitation, abnormal behaviour, paranoia, terror, and hallucinations, progressing to delirium.

Hepatitis B:

The acute illness causes liver inflammation, vomiting, jaundice, and, rarely, death. Chronic hepatitis B may eventually cause cirrhosis and liver cancer – a disease with poor response to all but a few current therapies.

Encephalitis:

Symptoms include headache, fever, confusion, drowsiness, and fatigue. More advanced and serious symptoms include seizures or convulsions, tremors, hallucinations, and memory problems.


That’s it. Definitely getting vaccinated.

Double Ouch

Ahh, but wait a second. Because these diseases are so rare in the United Kingdom, we have to pay for the vaccinations. OK, how much are we talking?

  • Rabies injection: £60.00
  • Hepatitis B injection: £44.10
  • Japanese Encephalitis: £80.00

That’s (*reaches for calculator*).. £184.10 !!

Ahh.. wait but another second, that’s the per injection price. Most of these vaccinations are for a course of 3 injections!!!

Triple Ouch

That makes for a total of £472.30 (the Japanese Encephalitis is two injections)

Before we’ve even packed our bags, we’ve spent more on vaccinations than all our other expenses to date put together. And you know what, after re-reading those symptoms, we don’t begrudge a single penny.